When you build a Lightning Web Component in Salesforce, you're not just writing JavaScript and HTML — you're defining how a component lives inside the Salesforce platform. Every LWC gets created, connects to the environment, renders on screen, reacts to data changes, and eventually gets removed. If you understand when these things happen, your components behave beautifully. If you don't, you get duplicate API calls, flickering UI, strange errors, and performance problems. That's where lifecycle hooks come in.
What Are Lifecycle Hooks in LWC?
A lifecycle hook is a callback method that runs automatically at a specific phase of a component's life. Salesforce controls the lifecycle timeline, and your component gets specific checkpoints where it can execute logic. These hooks help you answer practical questions like: When is my component created? When is it safe to load data? When can I access the DOM? When should I clean up listeners? What happens if a child component throws an error?
The Big Picture: Lifecycle Flow in LWC
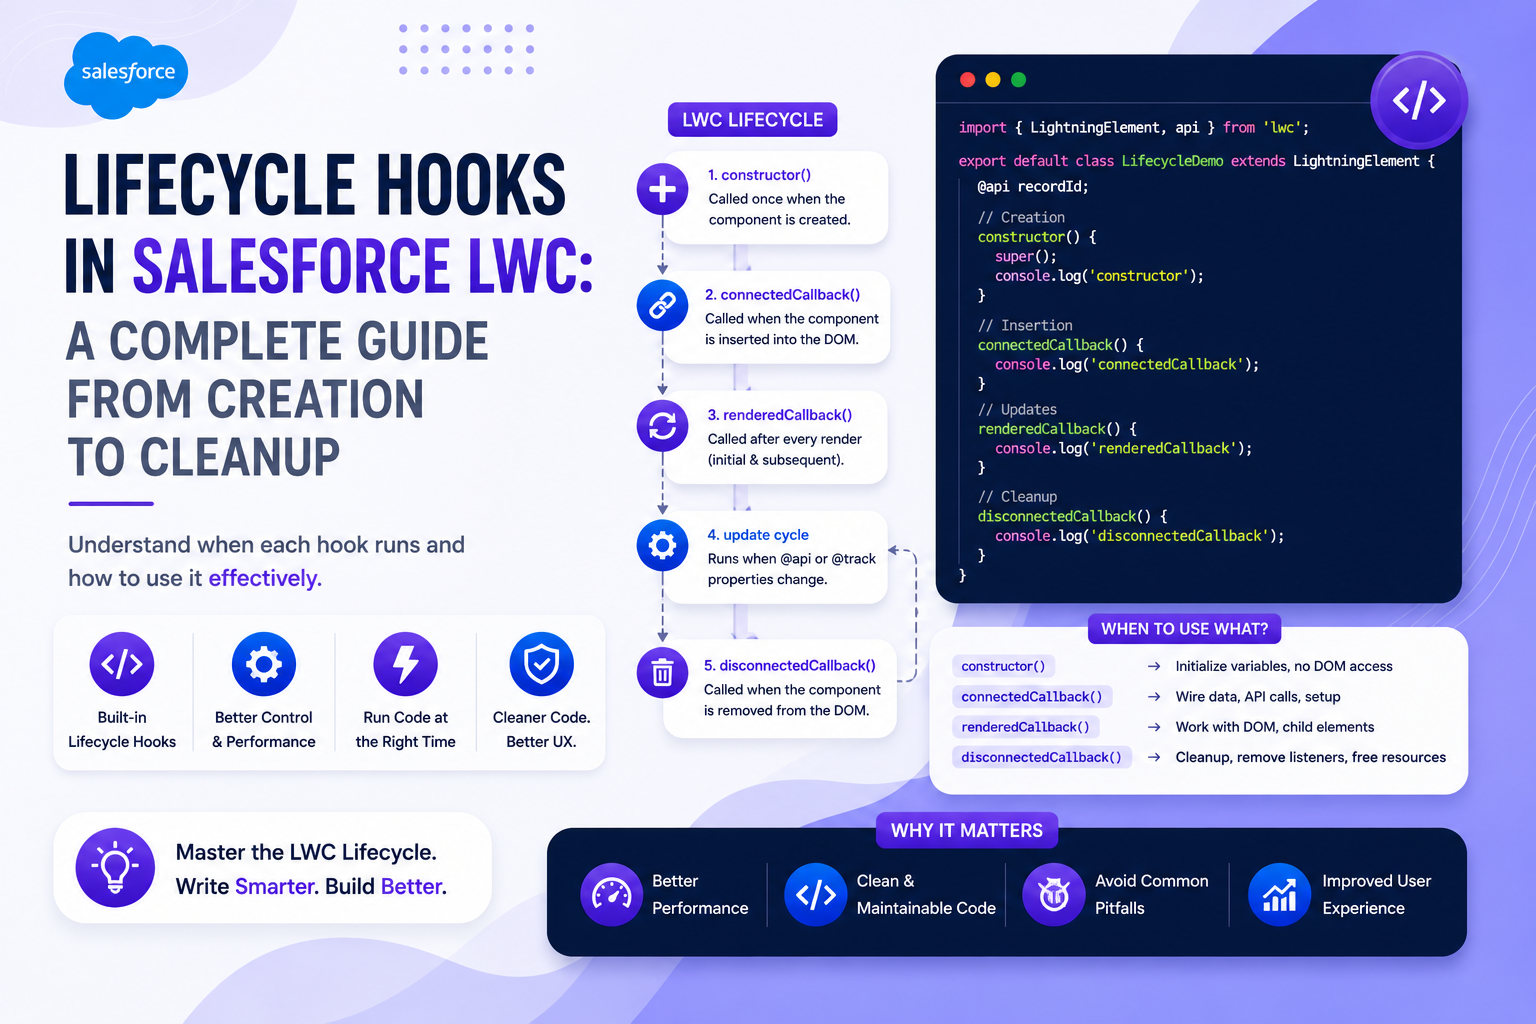
Think of a component like a person: Birth → constructor(), Entering the world → connectedCallback(), Becoming visible → renderedCallback(), Living and reacting → Reactive updates, Leaving → disconnectedCallback(), Handling unexpected problems → errorCallback().
Lifecycle Flow (Parent–Child Order)
The execution order when parent and child components are involved is: Parent constructor() → Parent connectedCallback() → Child constructor() → Child connectedCallback() → Child renderedCallback() → Parent renderedCallback(). Notice that constructor() and connectedCallback() flow Parent to Child, while renderedCallback() flows Child to Parent. That order matters in real projects.
1. constructor() — The Birth of the Component
constructor() is called when the component instance is created in memory. At this stage, the component exists in memory but the UI does NOT exist, the DOM is NOT ready, and the component is NOT connected to Salesforce yet. You must always call super() first, and you cannot access DOM elements, dispatch events, or load data from a server. Use it for setting default values, simple variable initialization, and lightweight setup logic.
import { LightningElement } from 'lwc';

export default class MyComponent extends LightningElement {
    constructor() {
        super(); // Always call super() first
        this.myProperty = 'default value'; // Simple initialization only
    }
}
2. connectedCallback() — When the Component Enters the DOM
connectedCallback() runs when the component is inserted into the DOM. Now the component is officially part of the page, Salesforce context is available, and data operations are safe. This is the right place for fetching data, calling Apex, setting up event listeners, subscribing to message channels, and initializing caches. If you remember only one rule: load data in connectedCallback(), not in renderedCallback().
import { LightningElement, wire } from 'lwc';
import fetchAccounts from '@salesforce/apex/AccountController.fetchAccounts';

export default class AccountList extends LightningElement {
    accounts;
    error;

    connectedCallback() {
        this.loadAccounts();
    }

    loadAccounts() {
        fetchAccounts()
            .then(result => { this.accounts = result; })
            .catch(error => { this.error = error; });
    }
}
3. renderedCallback() — After the UI Is Visible
renderedCallback() runs after the component has finished rendering and is visible on the UI. It flows from Child to Parent. Rendering is not a one-time event — it happens after the initial render AND every time reactive data changes. Use it for DOM manipulation, measuring UI elements, integrating third-party JS libraries, and post-render visual adjustments. Do NOT use it for loading data or repeated server calls. If you update a reactive property inside renderedCallback(), it triggers another render causing infinite loops — always use a boolean flag to prevent this.
import { LightningElement } from 'lwc';

export default class MyComponent extends LightningElement {
    isRendered = false;

    renderedCallback() {
        if (this.isRendered) return;
        this.isRendered = true;

        const el = this.template.querySelector('.my-element');
        if (el) {
            el.focus();
        }
    }
}
4. disconnectedCallback() — When the Component Leaves
disconnectedCallback() runs when the component is removed from the DOM. It flows from Parent to Child. In dynamic pages, tabs, and dashboards, components appear and disappear often. If you don't clean up properly, you get memory leaks, unwanted background processes, and performance degradation. Use it to remove event listeners, clear intervals, and unsubscribe from message channels. Think of it as 'leave no trace' — if you set something up in connectedCallback(), clean it up here.
import { LightningElement } from 'lwc';

export default class TimerComponent extends LightningElement {
    intervalId;

    connectedCallback() {
        this.intervalId = setInterval(() => {
            console.log('Tick...');
        }, 1000);
    }

    disconnectedCallback() {
        if (this.intervalId) {
            clearInterval(this.intervalId);
        }
    }
}
5. errorCallback(error, stack) — The Error Boundary
errorCallback() turns your component into an error boundary. It runs when a child (descendant) component throws an error during its lifecycle hooks or an event handler declared in HTML. It receives two parameters: error (a native JavaScript error object) and stack (a stack trace string). Instead of letting the entire UI crash, you can catch errors, log them, show fallback UI, and prevent full-page failure.
import { LightningElement } from 'lwc';

export default class ParentComponent extends LightningElement {
    hasError = false;
    errorMessage = '';

    errorCallback(error, stack) {
        this.hasError = true;
        this.errorMessage = error.message;
        console.error('Error caught by boundary:', error);
        console.error('Stack trace:', stack);
    }
}
Quick Summary of Hooks
| Hook | When It Runs | Flow Direction | Main Purpose |
|---|---|---|---|
| constructor() | When instance is created | Parent → Child | Basic initialization |
| connectedCallback() | When inserted into DOM | Parent → Child | Load data, setup |
| renderedCallback() | After rendering completes | Child → Parent | DOM logic |
| disconnectedCallback() | When removed from DOM | Parent → Child | Cleanup |
| errorCallback() | When child throws error | Parent handles child | Error boundary |
Final Thoughts: Lifecycle Hooks Are About Respecting Time
Good LWC developers don't just write logic — they place logic at the correct moment. When you understand lifecycle hooks, bugs reduce, performance improves, API calls become controlled, and UI becomes stable. Lifecycle hooks are not just technical concepts. They are timing discipline. And in Salesforce development, timing is everything.